
Cincopa offers a convenient feature that allows account owners to add additional members to their Cincopa account. This is particularly useful if you have a team of people working directly with you, such as professional webmasters, designers, or content developers, and want to provide your services to different Cincopa users.
Adding a new user is simple and does not require sharing your personal account login details. This ensures the ongoing security and privacy of your Cincopa account. When inviting additional members, you have control over their access levels. You can easily manage your team by adding or removing members as needed while keeping all teamwork saved and secure.
How to access Invite & Manage Members screen
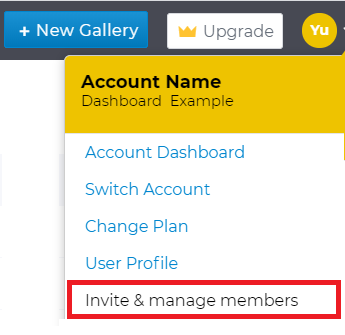
Once you are logged in, click on the profile icon in the top-right corner of the home page and select Invite & Manage Members.
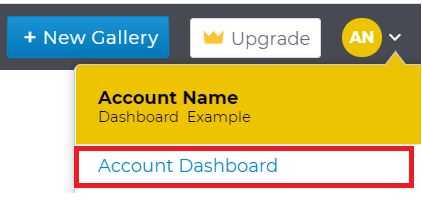
OR click on the profile icon in the top-right corner of the home page and then select Account Dashboard and navigate to the Invite & Manage Members option in the menu.
Let’s look at all of the options individually:
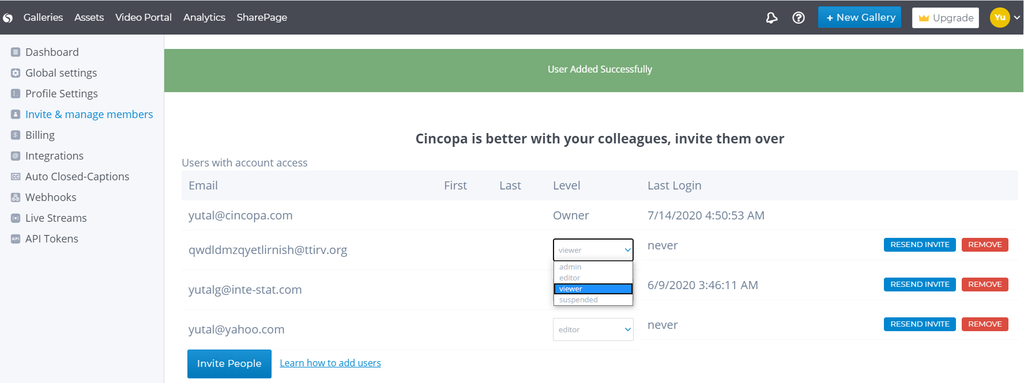
The user’s email address is required for accessing your account.
First and Last Name
Optional fields that help in easily identifying the users with access to your account.
Level Access Permissions:
Users have different access levels determining their actions within the account.
Account owners or admins can modify member privileges by selecting a different permission level from the drop-down menu next to the user. Once the permission level is changed, you will receive a notification stating ‘Status Successfully changed’.
Owner – This status is assigned to the email address associated with the account. The owner has unrestricted access to all account features. (For information on how to change the account email, refer to the relevant documentation.)
Admin – The Admin user has the same rights as the owner and can perform the following actions:
- Edit and manage the Cincopa account
- Edit and manage the galleries
- Upload and delete assets
- Invite new members and set their permissions
Editor – Users with Editor privileges can edit and manage galleries, assets, and view analytics. However, they are restricted from accessing the following screens:
- Invite & Manage Members
- Billing
- Integrations
Viewer – Users with a Viewer profile can only view galleries on your account.
Suspended – Users with suspended status have no access to the account.
Resend Invite
In the Invite & Manage Members page, you can choose to resend the invitation by clicking on the “Resend Invite” option next to the user’s information.
Remove
Each member listed will have a “Remove” button. Clicking on this button will delete the member and prevent them from accessing your account in the future, unless you invite them again.
Invite People
Clicking on the “Invite People” button will open a pop-up where you can add the email, access level, and name of the new member to grant them access to your Cincopa account.
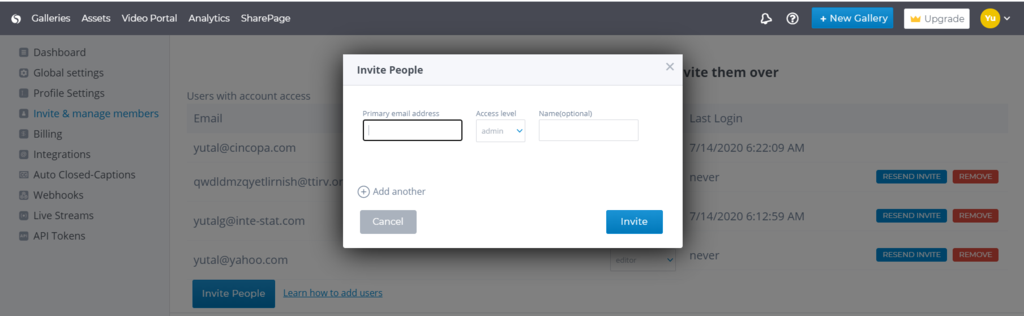
Once you have entered the required user details, you can either click the Invite button to proceed or click the Cancel button to disregard the invitation.
Clicking the Invite button will:
Pressing on the Invite button will:
- Send an invitation email with login details to the entered email address.
- Add the entered email to your Members list.
If you need to invite multiple members at once, you can use the ‘Add another’ option in the ‘Invite People’ screen to add them in bulk.